Homemade Pumpkin Bread

Homemade Pumpkin Bread
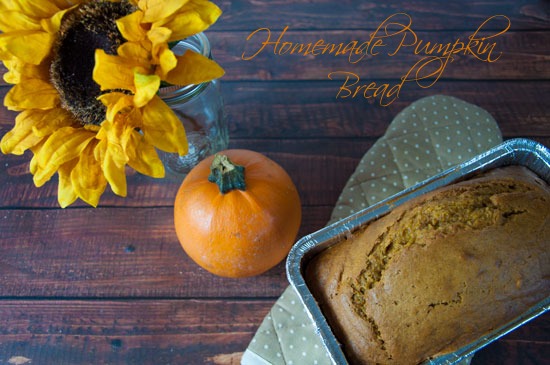
High school is usually a horrible memory for most people. Don’t get me wrong, I would never want to go back and I was a little bit nerdy for most of it, but I have some GREAT memories from high school. After moving across the country between 10th and 11th grade and being all teenage angsty for half of Junior year, I finally began to settle in at Northville High School and make some friends. My friends  consisted pretty much 100% of choir and theater people. We were together all the time at rehearsals and such so why not just hang out in our spare time too, right? I actually met my husband in the first play I ever did at NHS, but that’s neither here nor there. The point of this story actually has nothing to do with the story I just told…..oh well, the point is that our choir department would sell this pumpkin bread at the Victorian Festival each fall. We would all sign up to bake it and then sign up for a slot with our friends to sell the bread at the booth. Let me tell you, I don’t have much other experience with pumpkin bread other than this…..but God is it good! I have made it every Thanksgiving since high school and it gets rave reviews every time!

Homemade Pumpkin Bread

Ingredients:

  • 1 cup corn oil
  • 3 cup sugar
  • 4 eggs, beaten
  • 1 1lb can of pumpkin
  • 3.5 cup flour
  • 1 tsp baking powder
  • 1 tsp baking soda
  • 2 tsp salt
  • 2/3 cup water
  • 1/2 tsp cloves
  • 1 tsp cinnamon
  • 1 tsp nutmeg
  • 1 tsp allspice (or 3 tsp pumpkin pie seasoning)

Directions:

  1. Combine sugar, oil, and eggs.
  2. Add pumpkin.
  3. Sift dry ingredients into above mixture.
  4. Add water and mix well.
  5. Bake in a lightly greased and floured bread tin at 350 degrees for 1 hour.Homemade Pumpkin Bread

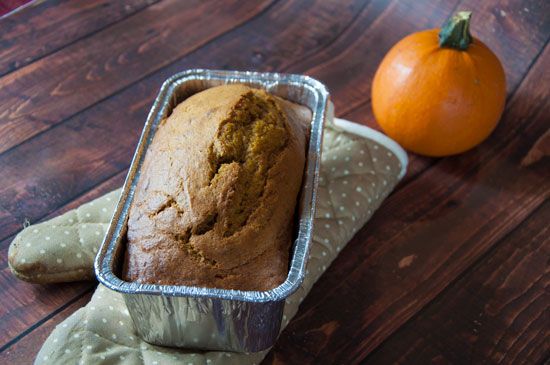
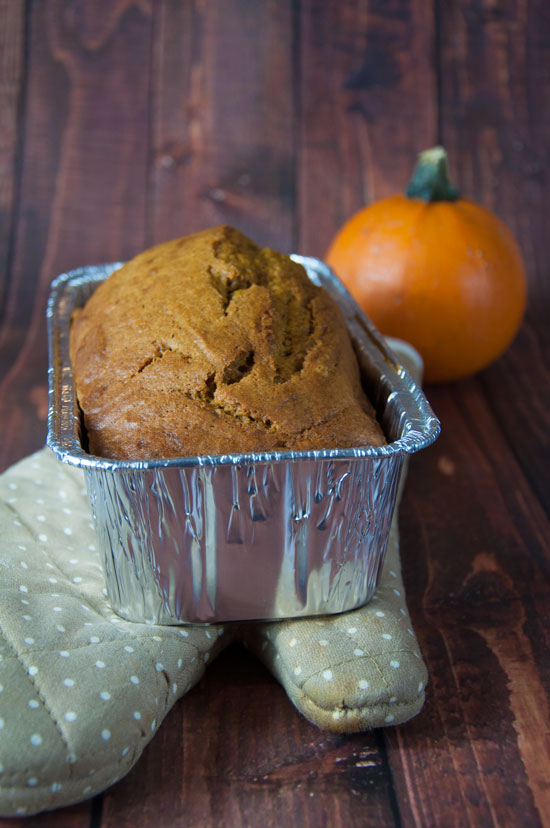
This recipe makes 3 regular sized loaves and freezes really well if you want to enjoy at a later date! I also suggest either making or buying cream cheese icing for it. A slice of pumpkin bread with a little cream cheese icing spread on it is the best! I hope you all enjoy and have a wonderful Thanksgiving tomorrow!

All That Glitters Blog Signature

Crock-Pot Pulled Pork Sliders

Pulled Pork Sliders in the crock pot

Yum. That’s all I can say about these pulled pork sliders. I made them a  few weeks ago for our Halloween party and again for dinner this past weekend. There is nothing better to me than meat that is so tender it shreds with a fork. That’s what I love the most about my slow cooker, it makes all the meats taste amazing! These are great for parties or football games because they stay warm in the crockpot for hours, but they work just as well for a meal with the family:) This recipe is so easy I only have 6 steps for you and the last one is eating!
Slow Cooker Pulled Pork Pulled Pork Sliders

Ingredients:

  • Kings Hawaiian Buns- You can get any buns really, but these are my favorite. I feel like they MAKE the sandwiches:)
  • Pork Roast
  • Broth
  • Barbecue Sauce

Directions:

  1. Put your roast into the crockpot with your broth. The broth is really only there to make sure that the pork roast doesn’t dry out. I used beef.
  2. Cook your meat on medium for 6-8 hours.
  3. Once the meat is thoroughly cooked drain the broth and shred the meat with two forks.
  4. Add barbecue sauce to the shredded pork.
  5. Cut open your buns and pile that meat on there!
  6. Enjoy!

Easy Pulled Pork Sliders in the Crockpot Crockpot sliders

Bacon Mushroom Orecchiette

Mushroom Orecchiette
Mushrooms are my favorite. I am the person who can find a way to add mushrooms in to any recipe. They are the best. When I found a recipe for mushroom pasta on Pinterest a couple of years ago I just about died. I have since committed the recipe to memory, changed it up just a bit, and perfected it. Add bacon, check! Add cheese, check! Add spice, check! This recipe is amazing because you can make it fit so many different tastes. Vegetarian? Add veggie broth instead of chicken, take out the bacon. Don’t like spice? Don’t add crushed red pepper. No cheese? Take that out too. You can mix and match the ingredients to get what you really want. Me? I think it’s perfect just like this, savory and delicious. See for yourself.
Mushroom and Bacon Pasta with Cream

Ingredients:

  • Olive Oil
  • Butter- 2 tbsp
  • Bacon- 6-8 strips
  • Mushrooms- sliced, 8 oz
  • Onion- diced, 1 large
  • Garlic-minced, 2-3 cloves
  • Orecchiette Pasta, 1 box
  • Chicken broth- 1 cup
  • Cream- 1/3-1/2 cup
  • Parmesan Cheese- 1/4-1/2 cup (Optional)
  • Salt
  • Pepper
  • Basil
  • Crushed Red PepperMushroom and Bacon Orecchiette with a Cream Sauce

Directions:

  1. Start with prep work. Slice the mushrooms, dice the onion, mince the garlic, grate the parmesan, get your water boiling, etc. 
  2. Using a tablespoon or so of butter and some olive oil, begin to brown your mushrooms. You can do this in batches if your pan is too small, but make sure they are nice and brown.
  3. Add your noodles t the boiling water at this point. Cook until al dente. 
  4. Put the mushrooms on a plate and begin the same process of caramelizing the onions. Cook your garlic with the onions. (Use butter and olive oil)
  5. Put the onions aside with the mushrooms and break out that bacon. 
  6. Cook bacon until crisp and then place on a plate to the side.
  7. Put the onions back in the pan and pour the chicken stock and cream in with them.
  8. Add your parmesan cheese to the mix and let it melt in with the sauce. (This is optional. I have done it with parmesan and without and they both taste fantastic.)
  9. Once the sauce has thickened up just a bit, add your mushrooms back in.
  10. Season to your liking using salt, pepper, basil, and crushed red pepper. (These are just suggestions on what I think tastes wonderful!)
  11. The bacon should be cooled and crispy by now. Chop it in to bacon bits and sprinkle in. 
  12. Stir in strained noodles and mix. 
  13. Top with Parmesan and enjoy!
**NOTE**
If your sauce gets to thick or there is not enough, add more chicken stock.
If your sauce isn’t creamy enough for your liking, add more cream.
Mushroom Pasta With Homemade Cream SauceMushroom Pasta
Even though this one isn’t quite in my bank of “skinny” recipes, it helps you get in your veggie intake! Haha! I hope you all enjoy! If you happen to make it, let me know how it turns out in the comments below!
All That Glitters Blog Signature

Cinnamon Apple Pork Roast

Cinnamon Apple Pork in Crock Pot Cinnamon apple pork roast- I had never heard of such a thing! Little did I know it would be one of the most tender, sweet, and delicious fall recipes I have ever made!I was wandering Pinterest the other day and came across some apple pork chops. Curious, I searched for apples and pork in the search bar an up came some recipes for apple pork loin! The more I looked at them, the more I knew I needed to make my own version! I made a trip to Central Market to get all the ingredients and got to work on our dinner for the next day. That’s one of my favorite things about crock pot recipes, I can get everything together at night, throw it on in the morning, and when I come home from work at night dinner is already done!


I started by taking 2 granny smith apples and cutting them into thin slices. I lined my crock pot with them, saving a few for the actual roast itself. Cinnamon Apple Pork I then made slits in my pork roast and shoved the apple slices in to those slits. Cinnamon Apple Pork Roast Next, I placed the pork roast on top of the apples and lined the sides with them as well. Yes, it is quite a bit of apple, but it gives oh so much flavor! Cinnamon Apple Pork Loin Once all of the apples were in place I sprinkled brown sugar, cinnamon, and a bit of extra virgin olive oil all over the entire thing. You could probably leave out the brown sugar if you don’t want the added sugar, but it really made it delicious, so I would’t cut it out:) Crock Pot Cinnamon Apple Pork The sides I chose were green beans and fingerling potatoes. I sliced them up and placed them on top of the apples to the side of the meat. I then sprinkled them with cinnamon, salt, pepper, and a few other little spices. I even threw in about a clove of chopped garlic since the hubby likes it so much! Crock Pot Cinnamon Apple Pork with veggiesAfter it was all done, I put the cover on and stored it in the fridge over night. When I woke up the next morning I put it on the cooker part of my slow cooker and poured in a little bit of broth, just enough to come half way up the meat. I used beef broth, but you could use any kind you may have on hand. I added a little more pepper and cinnamon and let it cook all day while I was at work. I am SUCH a crockpot fanatic, who doesn’t want to put your meal in a pot and not have to worry about it all day?! This is the one I use and I LOVE it. Only $30! Let me tell you…it was so juicy and tender, I didn’t even need a knife. A lot of the recipes I saw didn’t put any sort of liquid in their slow cooker and I think that makes the meat really tough, the liquid is the key! I also saw a bunch without brown sugar, which I think gave it a lot of taste. It was flavorful enough to eat without a barbecue sauce, but not too sweet. It really was just perfect! My husband and I devoured this one, and he is pretty tough to please!

Ingredients:

  • Pork roast
  • Cinnamon
  • Brown Sugar
  • Extra Virgin Olive Oil
  • Broth (I used beef)
  • Salt and pepper
  • 2 or 3 granny smith apples
  • Fingerling potatoes
  • Green Beans

Enjoy this wonderful fall recipe! I know I’ll be making it again soon! Love this recipe? Check out my round up of apple recipes! All That Glitters Blog Signature


Love what you see? Follow All That Glitters on social media for more style tips, recipes, and DIY projects every day! Instagram, Facebook, Twitter
 

Crock Pot Beef Stew

Easy crock pot beef stew1

If you ask google, today is the first day of fall. If you ask the weather channel it was yesterday. I’m going to go with today, since the autumnal equinox is what determines the first day of fall, and it happened at 10:29 P.M. last night, thus making today the first full day of fall:) So, there you have it….happy fall, everyone! To celebrate, I’m going to show you how to make one of my all time fall favorites, crock pot beef stew! I absolutely don’t know what I did before I owned a crock pot. I’m actually a little upset with myself that I didn’t have one during college. You can make such cheap delicious meals with a crock pot with minimal effort. Apparently I was too lazy for even a crock pot. <sigh> Well, thankfully I grew out of those lazy college days, got myself a crock pot, and have been making fantastic home cooked meals ever since. My husband would probably tell you that it’s the best gift he has ever given me…he gets great homemade food, I get to feel like I’ve accomplished something, it’s a win win really. Well, here you have it…the recipe of the season: crockpot beef stew!

Ingredients:

  • 2 cans beef broth
  • 2 lbs beef stew meat- cubed
  • 6-8 red skin potatoes- diced
  • 1 bunch carrots- sliced
  • Peas- frozen
  • 1 onion- diced
  • 1/4 cup flour

Crockpot Beef Stew

Homemade crock pot beef stew

Directions:

  1. Cut your meat and veggies into small pieces and place in crockpot (this is the one I have, I love it!).
  2. Add beef broth so that it is just covering all of your ingredients.
  3. Add seasonings- I like to add basil and oregano and a dash or so of crushed red pepper. I also like to add a bit of minced garlic as well.
  4. Add your 1/4 cup of flour and mix thoroughly. This will help to thicken the broth while cooking. You can also add a little bit of heavy cream if you would like to.
  5. Let cook on high for 6-8 hours depending on your crock pot.
  6. When you are almost ready to eat your meal, stick some buns or, my favorite, crescent rolls, in the oven.
  7. Serve by itself or over rice!
***To make paleo beef stew, just take out the potatoes and flour and add sweet potatoes and arrowroot flour instead!***

Beef Stew in the crockpotBeef stew from scratch


I hope you enjoy my version:) I opt for some peas instead of celery, I think celery tastes weird and permeates the whole dish, but if you love it go for it! Well, now that you have all the directions, I think it’s time for you to go on and make some delicious beef stew and while you’re at it you should whip up some easy homemade apple sauce for dessert. Why not? It’s fall after all:)

All That Glitters Blog SignatureLinking up with Yesterfood